To configure computers as kiosks using a provisioning package, use the following procedure:
- On a management workstation with Windows ADK installed, open Windows Configuration Designer.
- On the Start page tab, click the Provision kiosk devices tab.
- In the New project wizard, enter a Name and Description and click Finish.
- On the newly opened tab (which has the same name as the name you just provided), complete the wizard to define the following properties as necessary:
• Set up device
• Set up network
• Account management
• Add applications
• Add certificates - Then, on the Configure kiosk account and app tab, shown in Figure 3-31, define the following:
• User name for the kiosk account that will be created
• Password for the new user
• Enable auto sign-in if desired
• The user name that will be used for the kiosk (the same as the previously defined account)
• The app type and its AUMID (Application User Model ID)
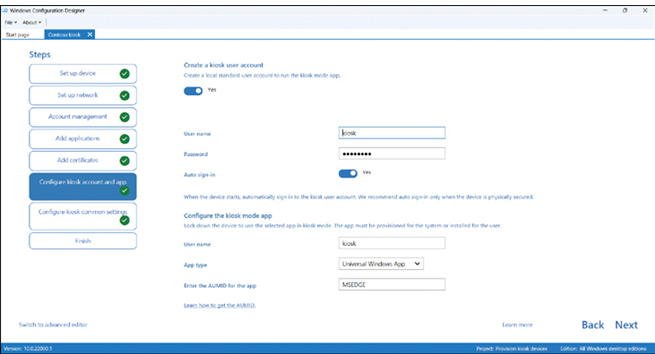
FIGURE 3-31 Creating a provisioning package for a kiosk
Note What is the Aumid?
To determine the AUMID for an app, use the Get-Startapps PowerShell cmdlet using the -name property, such as Get-Startapps -Name Edge. Then paste the returned ID into the Enter the AUMID for the app text box.
- Click Next, and on the Configure kiosk common settings page, define the following, as needed:
• Set tablet mode
• Customize user experience
• Configure power settings - Click Next, and then on the Finish tab, click Create.
After creating the package, copy the generated .PPKG and .CAT files to appropriate media (such as a memory stick) and distribute them.
Need More Review? Apply a Provisioning Package
It’s worth noting that a computer running OOBE detects the presence of PPKG files in attached storage devices, such as a memory stick. To review further details about automatically applying provisioning packages, refer to the Microsoft website at https://learn.microsoft.com/windows/configuration/provisioning-packages/provisioning-apply-package.